Friday, September 20, 2013

Handmade Gifts for the wine lovers on your list

Handmade Christmas Gifts continued...

I know, I know, it's SEPTEMBER. 
I get it. 
But it takes a long time to make all our Christmas gifts and I have to start a few months in advance otherwise it's just too overwhelming. 
And why make thoughtful gifts for our loved ones and not enjoy the process?

I made these gifts last year for the wine lovers on our gift list and they were both big hits.

{Oh, and if you plan to do this, enlist all the wine drinkers you know to save their corks for you! 
My sister's mother-in-law sent me a whole box last year which made these really easy!}

First up is a wine cork ornament. 
I initially thought this might be a little hokey but it's actually really pretty hanging on the tree.


I used the tutorial here and it came together super easily!

The other wine cork gift I made was a large monogram of wine corks stuck on a wooden letter.
I really love all the red wine corks mixed in with the white.
And if you didn't guess, our friends' last name starts with a C...


I had better luck finding the wooden letters online than in craft stores. Etsy has some good options and they're very reasonable for the size.
I tried to turn the winery names to the outer edge of the letter.


I used the tutorial here and it was great.
The only change I would recommend is using super glue instead of a glue gun, because the corks may pop off over time with the hot glue.


One more Christmas gift idea for your ever-growing list! 
Good luck!

Pin It

Tuesday, September 17, 2013

Do you hear jingle bells yet?

When you make handmade Christmas gifts like I do, you have to start working waaaay in advance. Like in August. Yep, no joke. I know that might sound horrific to some people, but it's totally worth it to me. I love knowing that our friends and family know how much thought and time I put into their gifts. And I feel like it's a great experience for my kids to learn how to give handmade gifts.

So, to those of you out there crazy enough (crazy like me, that is), I thought I'd share the gifts I gave last year.

At the top of my list every year are all the guys we know and love. What in the world can you make for a grown man that won't be totally useless?? Seriously, most of the things I sew are not man-friendly, although they would never say that to my face.  And, I will admit that I often create a hybrid, partially handmade/partially store bought gift for the manly recipients on our list.

Last year, the hybrid gift I decided on was a grill towel paired with a bbq rub. And it went over great!

I traced a butcher's cow diagram onto a pre-washed flour sack towel and ironed it to heat set it. 
Not sure if that's how you're supposed to do it, but it made me feel better.


I attempted a freezer paper stencil but decided that a fabric sharpie was a way better method to get nice, crisp lines and a good, solid black.


I bought the rub in multi-packs on Amazon of all places, but you can get bbq rub pretty much anywhere.
 

Then I wrapped each tin in a towel before shipping them off to our nearest and dearest.


So, there you have it! A little Christmas gift giving inspiration way too early!
I'll keep rolling out different ideas over the next couple months and round them all up in one big list closer to Christmas!
Pin It

Wednesday, September 11, 2013

No thread. No sewing machine.

It doesn't happen very often, but every once in a long while I create something that involves no sewing whatsoever. (it's hard to believe, I know) 
And if there's no sewing, there's a really good chance there's painting. I >heart< painting.

When I paint, I really, really love taking something ugly and making it cool. Like this classic 1960's dresser that I picked up on craigslist for $35. 
6 feet long, 9 drawers. Big cheer for storage space!
I can't even count the ways I love craigslist. 
There are just too many.

 I told you it was ugly.

I spent more on paint & supplies than the dresser itself. 
(Krylon ivory spray paint, in case you were wondering. I love spray paint only a little less than craigslist.)
But, total cost for this beauty was under $100!


 And I avoid taping off as often as possible. 
I make no excuses for cutting corners when there are three little people running around.


After a week long occupation of my husband's garage...
I present our new dresser in the master bedroom!!!


Recap.
Let's give it up for spray paint.

 
Confession Time. It was supposed to be for my kids, but once it was done I couldn't let it go,
And it works so well with our stuff!


The view when I'm lounging on the bed...
oh wait, I don't ever lounge on the bed.


And, original hardware! What's not to love??


I keep a few of my favorite things on top. They make me happy every day just to see them.
Little doggie ring dish from Anthropologie. (my only Anthro purchase ever, in fact)
A hand-me-down doily that one of my grandmas gave me.
Real, grown-up perfume.


And a couple of my favorite vintage books...of which I can never have enough.


The big thought for this Wednesday morning is go get yourself something really, really ugly on craigslist and paint it up!


Pin It

Monday, September 9, 2013

Pink or Blue??

You know how some people wait until the birth of their little one to find out the baby's gender? 
I think that's wonderful. A magical surprise in a life with so few real surprises. 

But, let's be honest, it's not so wonderful for giving gifts. 
When I'm making a baby gift, I really really want to know if it's for a bouncing baby boy or a sweet baby girl. 
But, instead I'm left with green or yellow...

Fortunately, I had some neutral baby flannel on hand and whipped up a matching set of gifts.


The go-to, all-time favorite, burp cloths. Because we all know you can't have enough of those.


And a onesie just because those teeny tiny things are so dang cute.


 And a diaper + wipes strap on the far right in the picture below (inspired by this tutorial over at calico)
since lugging a whole diaper bag can get old pretty fast.


Here's to a brand new life, pink, blue, or any other color out there!
Pin It

Friday, July 12, 2013

Deconstructed Dresden


Remember that Dresden Plate quilt block tutorial a few days back? 
Well, here is one of the things I did with the Dresdens that I made.


Technically, I didn't make a complete Dresden Plate for this. But it's my own take on the block and I'm pretty thrilled with it. It looks like an anthropolgie style pillow to me (if they wanted to pay me to design pillows, I'd take that job in half a second).


We're going to stay with friends for a week this summer and I hate to show up empty-handed.
This is my thank you offering for letting our party of five fill up their house.

It's an envelope style pillow cover (made using Delia's method) and the cover itself came together super quick.
Then I just appliqued the different pieces where I wanted them.


Want to know a little secret? I used a glue stick to keep the petals where I wanted them. Is that allowed? I don't know, but it can't be any worse than the fusible adhesive in the applique stuff and it's way less stiff which makes for a soft, cuddly pillow.


Here's hoping they love it and it's not too crazy to match their couch.

How cute is that lone little shoe over there?? 
I didn't notice it when I was taking the picture but I couldn't crop it out because it was just too sweet.
Pin It

Wednesday, July 10, 2013

Oh Baby {free baby nursery printable}

Recently, I needed a baby gift for friends and didn't want to give the same things I always do (you know, baby blankets, onesies, etc.). So I thought and thought and thought some more...and decided to make a printable instead of my usual sewing projects. I printed it off at home and put it in a nicely matted 8x10 frame. It makes a quick, easy (and gender neutral) baby gift!


Figuring I wasn't the only one with a baby gift dilemma, I thought I'd share it with you guys.


The text says...

You are a dream come true.
You are an answered prayer.
You are everything we hoped for.
You are the unexpected.
You are your own person, but you are our pride & joy.


You can get the pdf to print at home by clicking the image below.
Enjoy!

*For personal use only!*
*I will not be happy if I see these for sale on etsy or something, so please don't.*
Pin It

Sunday, July 7, 2013

Dresden Plate Tutorial


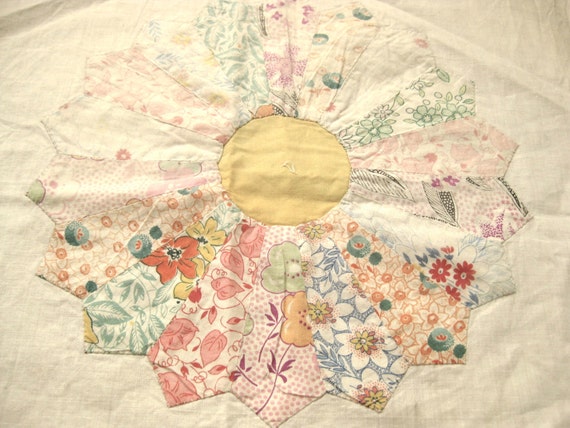
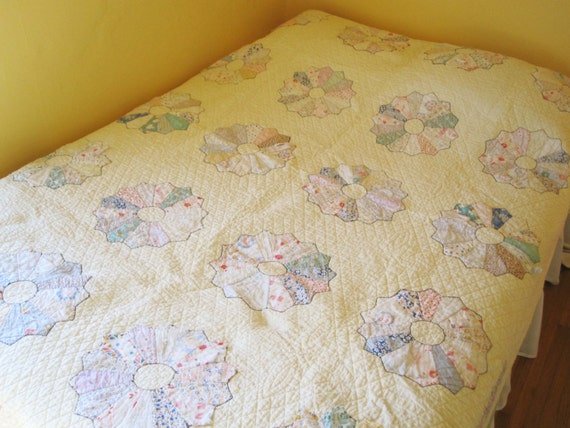
 Dresden what? If you are a quilting nerd like me, you might know what a Dresden Plate is. If not, they are blocks that look like large flowers with different colored/patterned petals all around and usually a circle in the middle. I am in love with vintage Dresden quilts, especially the hand quilted ones made with flour sack fabrics around the 1930's. Every once in awhile I get on etsy and daydream about buying one...

Vintage Dresden Plate Quilt Square  Feed sack Grain sack Material 
A single block (listing here)

1930s or 40s Cotton Hand-made Dresden Plate Pattern With Cream Background - Slightly Tattered But With Great History 
A really beautiful quilt (listing here

Then I realize, "Hey, I quilt. I don't need to buy one." 

While I do love the old Dresden quilts, I didn't want to reproduce them. For one thing, I think rehashing the same idea over and over and over is boring (apologies to traditionalists out there with crazy quilting skills). For another thing, the traditional Dresdens are just too "country" for me. So, I got out all my scraps and picked the brighter, more modern fabrics and did random mixes for each block and set to work...

One of these little rulers is super helpful. I got mine on Amazon with free Prime shipping and it even comes with a handy little bamboo turner. For this project, I used the 5" mark on the ruler.


Then I cut out 5" strips of all kinds of different fabrics and then used the ruler to slice them up like so. 
Personally, I think the busier a print is, the better it looks on a Dresden Plate but you can ignore that, or course.


It was kind of meditative for me, but it does border on tedious to cut out what feels like a million little wedges of fabric.
You will be rewarded with a bunch of neat little piles though.


Then fold each wedge in half lengthwise, right sides together, and sew a 1/4" seam across the wider end.
After sewing, clip the inside corner and each one should look like this.


After clipping a whole bunch of corners, you too could have a miniature flock of tiny fabric cranes on your cutting mat. They so remind me of origami cranes that I kept the pile on my mat the whole time I worked because they're so cute.


Next, turn each wedge right side out, gently push out the corner, and press flat with the seam down the center. With this template, it takes 20 wedges. Pressed, you should have a stack like this.


 Arrange them however you want. I tried to balance the circle with similar colors on opposite sides and I avoided putting similar patterns next to each other. But in the end, it's your quilt and you get to do it just how you want.

Sew all your "petals" right sides together along the long edge using a 1/4" seam allowance until you've joined all of them in a circle.


Now pile them all up and step back to admire your work!
You can applique them on a quilt, pillow cover, just about anything.
(Here's what I'm doing with the Dresdens...

Pin It

More Handmade Goodness

Related Posts with Thumbnails