Monday, May 28, 2012

Hello Monday

...and Happy Memorial Day!

The flag is flying out front (at least until it's dark) and we had 3 days with Daddy. 

I've been missing my sewing machine (still in the shop...sigh) but decided to do some hand embroidering because...why not, right?


It's part of my sister's birthday gift and I hope it makes her happy.

 
 {...intentionally vague since she isn't supposed to figure out what it is...}

Counting down to summer break here! 
Hope it was a wonderful weekend in your neck of the woods!
Pin It

Saturday, May 26, 2012

Winner!

We have a winner for the Shabby Apple giveaway and it's Randi who said,

Liked on FB, and I LOVE so many dresses it's hard to choose! Overboard is definitely among the top picks...I'm also really loving the new Stardust collection!

I'll email you with details, Randi. Have fun shopping!

Sadly, my machine is back in the shop since it wasn't quite right when I brought it home...
here's hoping I have her back next week because I have all sorts of half-finished projects stacking up.

Have a great Memorial Day weekend!!
Pin It

Tuesday, May 22, 2012

Shabby Apple Giveaway!

I don't know about you, but I am LOVING skirts and dresses lately. 
I am completely over my daily uniform of jeans and want to look like a real girl this summer. 
So, it was perfect timing when the folks at Shabby Apple contacted me about a giveaway (and a coupon code!) for you all!

They have some seriously great dresses (and a lot of other stuff). 
If you haven't visited their site, you really should. 

Here are some of my favorites that they have right now...

Ahoy!

Road trip, anyone?

Classic.

Even better, you could win $50 to spend at Shabby Apple!
All you need to do is...
1. leave a comment on this post
2. include in your comment which dress or item from their website is your favorite 
AND
3. make sure you "like" Shabby apple on Facebook here.

Important: your eligibility for entry is contingent on the Shabby Apple Facebook "like."

They've also been kind enough to offer my readers 10% off any purchase 
if you use the coupon code "handmademommy10off".


Good luck!

*Comments will be open until midnight Friday 5/25*
If your email address isn't visible in your profile, please leave it in the comment.
Pin It

Monday, May 21, 2012

Hello Monday

I hope you had a great weekend! We've had lots to celebrate around here. 
My grandma turned 90. Talk about longevity! I am counting on those genes to keep me going for a long long time. 

 
{My Grandma really did request a Roast. No joke. At least we have a sense of humor...}

AND my sister got to visit from Chicago! While she was here we laughed, shopped, ate, and she had a ton of fun with all the boys. We also got to watch the eclipse on Sunday night. A-ma-zing. It wasn't a total eclipse where we live, but it was pretty awesome. My husband got this photo, which I LOVE.


As promised, I do have a giveaway and it's going up tomorrow morning! Promise! 
Between the birthday extravaganza and a stomach bug tearing through our house last week (ick), I could not find enough time to post. 
But I picked up my sewing machine from the shop this morning and have new projects this week!

Have a great week!
Pin It

Wednesday, May 16, 2012

Mmmm...lemonade

My sewing machine is in the shop for maintenance...3 years is probably too long but at least it didn't turn into 4, right?
Of course, as soon as I drop it off I have a TON of things I wish I could be sewing.
But the good thing is that I'm not distracted by my to-make-list (lesson to learn here, trying to remember this...).


Today happened to be a gorgeous day and something about a sunny day just cries out for lemonade. 
At least that's what my four year old thought so we made lemonade.
By "made" I mean we used concentrate and then juiced a couple fresh lemons into it for that almost-homemade taste. 

And the lemon slices are just a nice touch. My 5 year old said it made his drink look fancy.
I have to agree.


The cutest part? The boys wanted to use the concentrate cans as their cups. 
With bendy straws, of course.
Ingenious, really.


Sunny weather, happy kids, yummy lemonade.
I don't know about you, but I'm already looking forward to summer break.

Oh, and the Shabby Apple giveaway will be tomorrow!
Pin It

Monday, May 14, 2012

Hello Monday

Happy (day after) Mother's Day! Whether you were with your mom, your littles, or both, I hope it was wonderful.


When my ever sweet husband asked what I wanted to do, I said "lunch at the beach" and "be with our families." 
Lucky girl that I am, I got both and it was stretched into a whole Mother's Day weekend.

The hearts my sweet boy drew in the sand for me.

The big boys looking for shells and rocks.

The baby discovering sand...

And do feet get any sweeter?
I think not.

The cherry on top of my day was when my 4 year old fell asleep in my arms on the patio with my in-laws.
Perfect weather, day, company, and snuggles.


 Oh, and look for a giveaway later this week!
Ever heard of Shabby Apple...? Uh huh. I'm super excited!

Pin It

Wednesday, May 9, 2012

Less Mess Lego Pinata


There are lots of great pinata tutorials out there (ice cream cone! Green Lantern! princess!),
even a couple really cute brick ones (this one is my favorite & very similar to mine) . 
But I have an aversion to paper mache. 
Cruising baby, hairy dog, lots of time required...not ideal conditions. I'm a big fan of shortcuts.

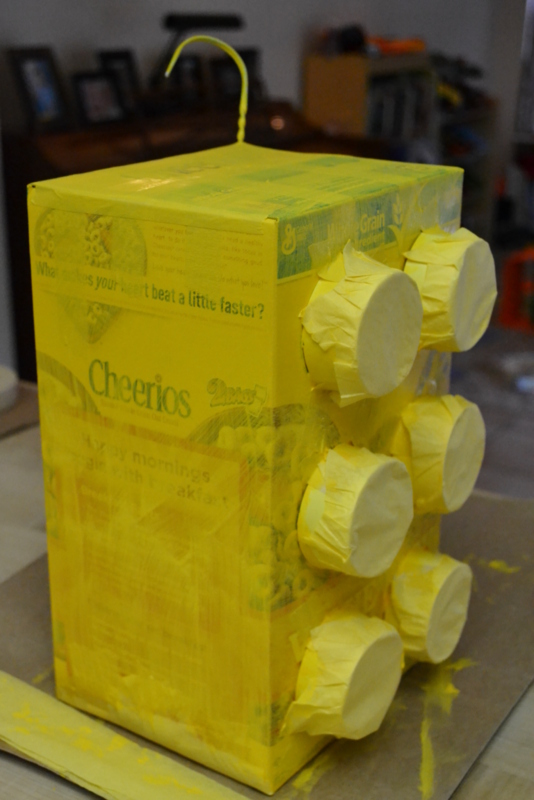
And it turns out that a jumbo box of cheerios is just the right shape for a Lego brick!

You will need the following...(I got everything I needed in one trip to Walmart)
twin pack of cereal
wire coat hanger (the kind with the cardboard tube)
small party cups
yellow craft paint & brushes
yellow tissue paper cut into long 3" fringe strips
masking tape
white glue

(Ignore the cardboard - I changed my plan. And the glue isn't in the picture.) 

I wanted to create as few holes in the box as possible, 
so I opened the top (took out the cereal of course) and put the wire part of the hanger in the corner of the box.
(it will hang at an angle now which I LOVE)
 

Then I poured the candy and toys in and resealed the box, 
putting glue on the spots that had been glued before in addition to using masking tape.


Cut one inch off the bottom of your cups and tape onto the front of your pinata.

Give the whole thing a coat of paint...

At this point, I got paranoid that my pinata would spontaneously fall apart and put more tape on. 
It can't hurt, right?


Cover your "bumps" with tissue paper using a thin line of white glue & give it another coat of paint...

Now put your tissue paper fringe all over, using a thin line of white glue for each strip.
I would start from the bottom and go up, and save the front for last.
(I didn't do it this way, just realized after the fact that it would have been smarter)

This will be hard to bash open and you'll probably want to cut a pull string trap door in the bottom
for after the kids take a few turns and your pinata isn't giving up the goods (lesson learned after the fact...).
You'd just cut a hole about 3"x3" in the bottom and attach a ribbon loop to it.
Then seal the hole with a piece of tape so it stays closed for bashing but opens when pulled.

When it's done, fold over the hook at the top to make a closed loop.

Now you can tell everyone that the pinata hanging from that tree over there was made by you!


Pin It

Tuesday, May 8, 2012

Why thank you, Lego style


While planning our Lego birthday, my favorite place for inspiration was delia creates.
A seriously creative & generous mom who posted adorable stuff & some free downloads.


She even has a sheet of Lego bumps you can download (in this post).
I originally intended to make a banner with them but instead made up thank you cards.
The best part is that they are card & envelope in one!
If you get the urge to make your own fold-and-send cards, here is my low-tech template.
You could do this with any all over print, of course.
Download here. For personal use only. 

Print on cardstock, fold up, and seal with tape. Done!


I guarantee they'll make your guests grin when they show up in their mailboxes.
Pin It

Monday, May 7, 2012

Hello Monday...and want to swap?

I hope you had a great weekend! We did the Lego Party, of course and enjoyed lots of time with family and friends. That makes me a happy girl.

And lately I've been thinking about joining or orgnanizing a quilt block swap. Has anyone out there done this before or know how it works? I just want to make up a modern 12 1/2" block and get one in return. Maybe get a group of seamstresses together who like making modern quilt blocks? What do you all think? If anyone has experience in this or even knows of a swap I could just join, can you let me know?

My head is swimming with ideas and I have some great fabrics just waiting to be made into little bits of art. 
I'd love to get a bunch of us together on this...

Hope your week is off to a great start!
Pin It

Lego Party!

My son's Lego birthday party this weekend was a huge success...for everyone except the birthday boy. 
Sadly, he was in a funk that day and felt icky so I brought him home and the party kept going without us.
No reason to torture the kid on his big day, no matter how much effort we put in.

The cake and cupcakes...


I built silverware holders with the kids' Legos (got the idea here).
If you do a Lego party, I recommend Wal Mart for party supplies. 
They had a whole bunch of paper goods and plasticware in classic red, blue, yellow & green for super cheap.
I got the treat bags and tablecloths there, too. 
Easy Peasy, as my 4 year old loves to say.


Lego brick candy in blue bags so each little guest had a little something to take home.
You can really build with it and it's yummy, too!
(hint: you can buy it on Amazon)


My kids love face painting so we did Lego bricks for all the kids in any color they wanted.
(I think this guest might have enjoyed one of the blue cupcakes...what do you think?)

 
The lego brick pinata!
(which I'll post about later this week - now here)


It was a perfect day at the park and we were surrounded by family and friends. 
And even though my little man was under the weather, I did get lots and lots of snuggles (the only good thing about sick kids, in my opinion). 
Really, a good day overall.
Happy, Happy Birthday our (not so) little one!
Pin It

Friday, May 4, 2012

Mod Lego Cake


{the cake with our birthday boy's latest creation}

Tomorrow is the Lego party and we are in full party prep mode around here! 
Usually, I pride myself on low-key, simple birthday parties...but this one got away from me somehow.

I was determined to make a cute cake and started out with this super cute one...
and I abandoned it. Right into the trash. 
I'm sure someone with more cake expertise could make it work,
but I am a seamstress first, baker almost last.

So I made a mod cookie-top Lego cake!

Enter the packaged cookie dough! You'll need one package of dough, flour for rolling out, a square cookie cutter (or even just a sharp knife), a box of cake mix, vanilla frosting and food coloring.

First, roll out 1/4 of the tube of dough into a big "cookie" and bake according to package directions.
(Do not use your cookie cutter!)

While it's baking, enjoy some caffeine because maybe your kids have been sick all week like mine.

Use your cookie cutter or knife AFTER baking, while the cookie is still warm, to get nice sharp edges.
 

 Forget that you're covered in flour and try to pet your dog.
(then wash your hands!)

While the cookies cool completely, mix up vibrant Lego color frosting.

 Trace the bottom of your cake pan onto a brown paper bag for a "template."

Now would be a good time to bake up that cake mix.

 Play around with your cookies until you get a layout you like...

Frost your cookies up!
If you're lucky, you'll have a little helper who frosts the extra ones for you.
{I like to think I'm laid back, roll with it, blah blah blah, 
but for the keen observer, you'll see that I drew out a color coded cookie map before frosting them...}

After your cake cools completely, slice off the rounded top and frost the whole thing with homemade a can of frosting.
 

Arrange your frosted cookies on top of your cake...

Transfer to your serving tray and admire your craftiness!

Pin It

Tuesday, May 1, 2012

Lego To Go! (with free image)

Since my 3 (almost 4!) year old doesn't read the blog yet, this should be safe to post.
For his upcoming Lego-themed birthday, I made him a zippered Lego tote!

Both my older boys are really into Legos right now and my 3 year old requested a Lego party.
We have an awesome Lego bin, but we've pretty much reached capacity and I couldn't find anything else I really liked...

Oh, wait, I sew! I don't have to make do with so-so mass-produced everything. I can sew a bin!
 And so I did.

Or, should I say, I did TWICE.

First, I made this fabulous zippered pouch with boxed corners.
Pretty cute, huh?
{Loving freezer paper stencils lately...}


However, I put in the zipper upside down.
Sigh.


Not my first time down zipper street, but apparently I was distracted by all this crazy in my house.

I savagely tore it apart and made it into a smaller tote,
now with a handle for those on-the-go days.


 My creation with his "namesake," so to speak.


The red zipper is way cuter than the first one anyway.
That's what I keep telling myself.
That, and my soon-to-be four year old will love it because Mommy made it & it's Lego.


The lining fabric also makes me really happy...in a smiley Lego face kind of way.

If you want to make your own Lego tote, 
here's an image you can use for your freezer paper stencil or even applique.
Enjoy!


*For personal use/inspiration/copying only. No joke.*
I know it's cute, but if you try to make and sell these I will chase you down. 
Not to mention what the official Lego people might do to you with all that money tied up in patents, copyrights & lawyers...
Pin It

More Handmade Goodness

Related Posts with Thumbnails