
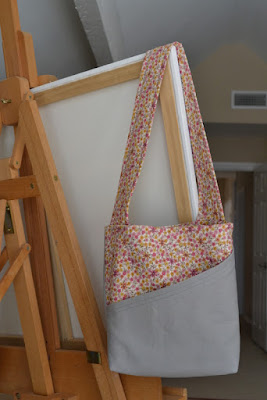
Thanks to Rachel, we've got a name for my little bag...the Busy Bag!
How appropriate for this busy lady, chasing 3 busy boys around.
How appropriate for this busy lady, chasing 3 busy boys around.

And, thanks to a few stolen moments with my machine & camera, we have a tutorial for said bag!
As always, customize the dimensions to your heart's content.
These are basic dimensions and how-to steps so you can make it your own.
*Tutorial for personal use only*

As always, customize the dimensions to your heart's content.
These are basic dimensions and how-to steps so you can make it your own.
*Tutorial for personal use only*

Materials
3 cuts of 12 1/2" squares lining fabric (duck cloth in this tutorial)
2 cuts of 12 1/2" squares of body fabric (canvas print here)
6"x32" piece for strap, backed with fusible fleece
12 1/2" piece of straight or bias binding
12 1/2" piece of straight or bias binding
2 scraps of coordinating fabric for interior pocket (mine are 5 1/2"x6 1/2")
magnetic closure + 2 small squares (about 1 1/2") of heavyweight fusible interfacing
magnetic closure + 2 small squares (about 1 1/2") of heavyweight fusible interfacing
8"x3" piece of plastic canvas
coordinating thread
{Unless otherwise noted, I used a 1/2" seam allowance for this project.
Seems sturdier for an everyday bag.}
note: You can use any fabric you want - your project, your rules. That's why we sew, right?
But if you use a quilting cotton or other lightweight fabric, make sure you back it with fusible fleece before sewing to give your bag nice body.
For the interior pocket, sew 2 rectangles of fabric wrong sides together using a 1/4" seam allowance, leaving an opening to turn.
Clip corners, turn right side out and press.

Stitch to the right side of one of your lining pieces with the opening at the bottom of the pocket to close it up.

For magnetic snap placement, mark both your lining pieces 1 1/2" from the top and centered horizontally,

Iron your interfacing over that mark on the wrong sides.

Attach your magnetic closures on the right sides.

Fold your strap piece in half lengthwise, right sides together and sew down the length.

Turn right side out, press with the seam centered and topstitch along both edges.

Decide how big you want your outer pocket (example: 12 1/2"x8")
and edge stitch binding along raw edge that will be the top of your pocket.

You can also do this on an angle, like the first bag I made...
Sew your lining pieces right sides together down the sides and across the bottom, leaving about a 5" gap at the bottom to turn.
You will put the plastic canvas through this opening later, so don't make it too small.
Next, match up your body pieces right sides together with the outer pocket in between.
Like the picture below...
and edge stitch binding along raw edge that will be the top of your pocket.

You can also do this on an angle, like the first bag I made...

Sew your lining pieces right sides together down the sides and across the bottom, leaving about a 5" gap at the bottom to turn.
You will put the plastic canvas through this opening later, so don't make it too small.
Next, match up your body pieces right sides together with the outer pocket in between.
Like the picture below...

Sew these 3 pieces together, down the sides and across the bottom, no opening for turning needed.
Box your corners on both the lining and body at about 1 1/2" from the end and trim excess.

They should look like this...

Now pin and sew your strap in place, centered on the side seams of the body with right sides together.

To reduce bulk in the side seams, pin the seam allowance open like so.

Nestle the body inside the lining, right sides together with the strap tucked down between them.
Pin and sew all the way around the top.


and it should look like this.

Push the lining down into the body and feed the plastic canvas through the hole you used to turn.
Edge stitch the opening closed.
Reposition the canvas so it fits nicely at the bottom of your bag.
You could hand stitch the canvas to the lining inside to keep it from shifting too much but this seemed like a hassle to me.
Press and pin along the entire top edge of your bag.

Edge stitch around the whole top and you're done!!

Now go somewhere fun!
Or, maybe go to the grocery store or your kid's gymnastics lessons.
Like I do.

Cute bag! Thanks for the tutorial. :)
ReplyDeleteThanks for the great tutorial! This looks like the perfect tote bag, I can't wait to make one!
ReplyDeleteI like the name! And the bag is so adorable. I've nominated you for the Versatile Blogger Award! Please stop by when you get a moment to check it out. :-)
ReplyDelete